I’ve been reading online how to price handmade items and each time I finish an article, I am floored, if not more defeated than before I started.
I fully agree with taking in all cost of the product when considering a final price, and as such, adding a few bucks extra as an incentive, but all this doubling to wholesale, then doubling to retail stuff can be one heck of a struggle! Maybe this would work if you expect to sell things full time and are an accomplished crafter; your name is out there, it’s your only paycheck, Ellen Is raving about it and calling you up. When it comes to reality, however, this information can ruin a promising business, on small talk terms.
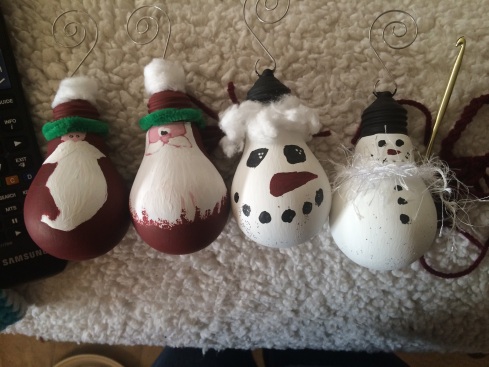
Take for example, my lightbulb ornaments I have seemed to make into a tradition around this time of year. Following the rules of the things I’ve found online, I’d have to sell each ornament for $50-70 to make a profit. WHAT?!!? No, no, no. Even someone not in this business can purely see that is not the case here. I am in no ways an accomplished artist, and even if I was, if I had to spend that much money on a simple lightbulb with some paint slapped on it to make a cheery looking snowman, I’d turn right around and walk out without a purchase.
True, hard work does go into it, but it’s a given with any handmade gift. Even simple little earrings, or a small doodle shouldn’t go for more than someone is willing to pay for it.
When I started selling my knitted hand warmers in a consignment shop, I decided on a price of $25. It’s a modest price for an item that only cost me less than $10 to make, and from that single skein of yarn, I could make 2 and a half pairs of them. Using the foundations I have come across, that price would be too low. Let me explain:
The yarn I was using cost roughly $8. I could make two sets of gloves, so it would come out to $4.00/pair. $2 for a new set of knitting needles would bring it up to $6.00. Now they’re telling me that I should make my labor costs around $10/hour. It takes approximately 4 hours to make a pair, so that would be $40 in labor. Total cost so far is $46. Now I would have to double that to come to my wholesale price…$92. Now I’d have to double that again to come to my retail price…$182.00.
One pair of handmade knitted warmers would cost you, as my buyer, $182.00 if you were buying from me.
That’s quite absurd. Even using the formula I found on another site, the retail price of a pair of my gloves should be $101.00.
If that’s the case, I better have made my gloves out of the hair of a unicorn from the mountains of Tibet!
As such, I just wanted to share my way of pricing items that I hope would give others in this romp of decisions a way to ease their mind. Using my lightbulb ornaments, I shall explain to you my pricing scale.
I utilize the dollar store. It’s a crafters best friend. I can buy a 3 pack of lightbulbs for $1. That’s .33 cents each, and what I will base my price off of. A packet of ornament hooks for a dollar, we’ll say about 10 to a pack. .10 cents each. We’re up to .43 cents. Glue sticks are a pack of 20, .05 cents each, and I can make about 5 ornaments with one stick: .44 cents.
Each ornament takes about 4 hours to make. With labor charges, I’d already be pushing $40 here, so I’m going to drop it down to $3/hour. Total cost so far? $4.44. Paint I already have on hand, but all of the product I bought together cost about $15. I’ll just say I use about .05 cents of paint for each ornament: $4.49. Paintbrushes I already have, so that’s free for me. New ones for this kind of project can be found at a dollar store: $5.49.
That’s all I have to consider for my material/labor cost. $5.49. Now to get my wholesale cost, I’ll double that to a nice even $12.00. For a little extra profit, I’m rounding it up to $15.00/ornament. That’s doubling my price for one ornament! Because of the product, I’ll still have enough paint and other supplies to last for dozens of ornaments more. If I sell all 3 lightbulbs, I’d have made $45.00. Minus $3 to replenish my lightbulbs, that’s $42.00. That’s a hefty $36 profit.
Now, this is only taking the lightbulbs into consideration. I do use this way of pricing for everything else I do as well, and guess what? My items always sell. The consignment shop I sold at had asked me if I wanted to stick with my price and not raise it. I’m sure I could try a game of roulette and raise my prices until no one buys anymore, but why do that when the price I have is already reasonable and brings in a few extra dollars in pocket cash?
My advice is to add up your products, do the tedious math on figuring out how much is used on one item, and raise it from there using your gut instinct. Don’t undersell yourself, but don’t oversell yourself either. Take your product to family and friends and ask them to honestly tell you what they’d feel comfortable paying for it. Use your own judgement on your work; you know that wonky, splotchy painting would never sell for $100, but maybe for $20 someone would buy it. That scarf has holes, dropped stitches and a few wrong color additions, it definitely isn’t worth $30, so maybe add it to a clearance special and sell it for $5.
It’s a bit of a struggle to get it right, but you’ll never know unless you just throw it out there for the world to decide.
Merry Christmas!

