Well hello!
So you wanna knit? And you came to my page? Be prepared to get hugged tightly! I am working on a video, but I’m the kind of person that says ‘um’ a lot and would rather not provide the public with a video filled with ‘ums.’ So, until I can learn a script and stick with it enough to make a decent video, I have put together this little ditty for you! If you are at all confused on any of these steps, please let me know and I will try my best to clarify everything for you. I tried to take the best and most descriptive pictures as was possible, keeping the beginning knitter in mind!
LEARNING TO KNIT:

Before You Begin
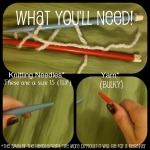
One cannot knit without the proper things to knit with. Get a pair of knitting needles; any kind will do (wooden, plastic, metal)…though I find the plastic or wooden needles will hold the yarn on better so it won’t slip off the tips. You can use whatever simple yarn you would like. Make sure it isn’t fancy (as the more poofy the yarn is, the harder it is to work with). Just a basic kind of yarn will work great for beginners! You can use bulky yarn as it’s easy to hold on to, but make sure it’s in a fiber that isn’t twisty, or glittery.
The needles I have in the pictures are needles I bought at my local craft store. They are plastic and made especially for beginners/teachers. They come in a pair with one red and one blue for less confusion when talking about what you’re doing with which needle. In this case I will be referring to either the blue needle (which will be your left needle for now) or the red needle (which will be your right needle for now).
CASTING ON/KNITTING:
So I couldn’t, for the life of me, figure out how to put the pictures on here without adding them to a gallery (it did it automatically, I swear…and I’m getting older to where technology these days boggles my mind too much XD). So, I will put the instructions down as steps, and if you need a visual, you can just pick the picture that correlates with the step you’re on from the gallery…until I can figure out how to change it and make it easier for everyone.
Things to note:
*’Stitch’ and ‘loop’ are the same thing, just different terms in this tutorial.
*I will be using the words ‘front’ and ‘back’ throughout this tutorial to distinguish which side your needle should be on. ‘Front’ means the side of your work facing you. ‘Back’ means the side of your work that is away from you.
*When I mention ‘working yarn,’ I’m talking about the yarn that is connected to your skein.
*Right and Left mean just that.
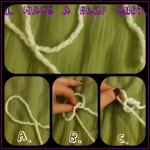
STEP 1:
Make a slip knot.
a.) Make a loop with your yarn.
b.) With your pointer finger and thumb, go in the loop from the top, and under the loop, and grab the edge of the string that crosses over the top.
c.) Pull the string through the loop until the knot you just made tightens. Don’t tighten it too much, yet.
STEP 2: – casting on.
Insert your blue needle (the left hand needle) through the loop and pull the loop a bit tighter (not too tight! Tight stitches are a headache to work with so be sure to keep all your stitches from here on in. loose!). Take your red needle (right hand needle) and place it into the loop on the blue needle, in the back of the stitch, from the right to the left.
STEP 3: – casting on.
Keep in mind that you’re going to see two strands of yarn sticking out from your work; a short end, and your working yarn. The short end is the end you will not be working with any longer (don’t cut it off, you’ll have to weave it into the edge of your work when you’re done). I have highlighted your working yarn in a pink color so you can see where you’re supposed to be looking in this step.
a.) Take your working yarn behind the red needle and wrap it around the front of the needle from left to right.
b.) Pull the yarn and red needle downwards and you will see your working yarn peeking through the loop on your blue needle.
c.) Grab the working yarn with the tip of your red needle and pull it through the loop on your blue needle.
STEP 4: – casting on.
In this step, you will be transferring the loop that is now on your red needle, over to the blue needle.
a.) This is how your knitting should look right now. One loop on your blue needle, and one loop on your red needle.
b.) Take the point of your blue needle and put it against the right side, front loop on the red needle.
c.) Push the tip of the blue needle through the middle (still right side) of the loop, and transfer the loop on your right needle, to the left.
–If this last step is confusing you, think of it as putting the stitch on the right needle back onto the left – except you’re taking the front of the loop and placing it to the back of the work now.
Keep repeating steps 2-4.
This is known as Casting On. This is how you will start every project you want to knit. Though there are many different way’s of casting on, this is the easiest and most popular for beginning knitters! Keep in mind that the number of stitches you cast on will be the width of your project (as you advance in knitting, this rule will change, but for now as a beginner, if you cast on 11 stitches, your project will remain 11 stitches throughout. If you cast on 100 stitches, your project should stay 100 stitches throughout…etc etc etc.). I just so happened to repeat these steps 11 times to bring us to the next steps in the Knit stitch. Feel free to cast on as many stitches as you want (please make it more than 11 if you feel like it), or however many until you feel comfortable enough to move onto these next steps.
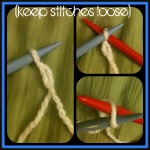
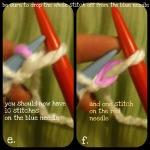
STEP 6: – Knit stitch.
If you count the colorful arrows in the picture, you will see what I mean by ’11 stitches.’ In the top of the picture, they are all on the blue needle. In this step, we will be transferring all the stitches from the blue needle, over to the red needle. You may be tempted to put the stitches back on the blue needle–so just keep repeating to yourself ‘keep it on the right needle.’
a.) Take your red needle (your right hand needle) and place it at to the left side of the front stitch that is closest to the tip of your blue (left hand) needle.
b.) Push the tip of the red needle, from left to right, through the center of the stitch – front to back.
c.) Take a look at your needles and make sure they appear as they do in the picture.
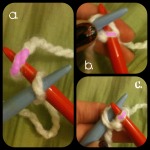
STEP 7: – Knit stitch.
These steps are reminiscent of casting on. It’s fine if you think of them in the same way, just remember – you’re working through the front of the loop instead of the back of the loop – and you’re taking the loop off of the blue needle and keeping them on the right needle.
a.) Take your working yarn behind the red needle and wrap it around the front of the needle from left to right.
b.) Pull the yarn and red needle downwards and you will see your working yarn peeking through the loop on your blue needle.
c.) Grab the working yarn with the tip of your red needle and pull it through the loop on your blue needle (you can refer to Step 3 if you need to see the highlighted yarn again).
d.) Do not put this loop on the blue needle! Keep this loop on the red needle and keep your stitches loose!
STEP 8: – Knit stitch.
e.) The stitch you just pulled the new loop through – drop it off of your blue needle. Don’t be scared.
f.) If you did this correctly, you should have the stitch you just made on your red needle, and the stitch you just dropped off of the blue needle forming a ‘V’ shape at the bottom of the new stitch.
continue steps 6-8 for the KNIT stitch.
*When you get to the end of the row and all the stitches are taken from the blue needle to the right needle: Place the red needle into your left hand. Place the blue needle into your right hand. You’re now ready to start repeating steps 6-8 again!
-
- Starting off: Things you’ll Need.
-
- Step 1.

-
- Step 2.

-
- Step 3.

-

- Step 4.

-
- Step 5.

-

- Step 6.

-

- Step 7.

-
- Step 8.

-

- Step 9.

-

- You’ve Learned the Knit Stitch!

–Horray! You just made your first knit stitch! Wasn’t that easy? Did you remember to keep the stitch loose?! After you finish knitting your first row, count all the stitches on your red needle. Do you still have the same amount that you casted on before step 6? If you did, then you can continue on to the next row! If you didn’t, then you might consider starting over. Sometimes, if you ended up with more stitches, you wrapped your working yarn around your right needle one too many times, or didn’t drop a stitch off your left needle fully. If you’re ending up with less stitches than you started, then you’re dropping stitches from your left needle without knitting them. In that case, might I remind you of a few old knitters adages for everyone to keep in mind? ‘A stitch in time saves nine.’ and ‘Ripping is a part of knitting.’ I’ve had to start many a project over because my stitches would change count mysteriously. Even to this day, there are times where I wonder how I lost stitches or had stitches sneak in. The more you practice and the more you study your needles and yarns and loops, the better you’ll get at recognizing a mistake before it happens – and even pick up a few dropped stitches no matter what the pattern or how far down your stitch unraveled.
Once again, should any of these steps confuddle your mind and turn it to jelly (I wouldn’t blame you – it took me a good fortnight to actually recognize what I was doing when I started), please feel free to shoot me a question! 3dknits@gmail.com
Happy Knitting!

what say you?